This creamy Instant Pot rice pudding recipe needs just 3 ingredients and 30 minutes-no eggs or condensed milk! Whether you're after comfort food or a quick crowd-pleaser, this simple pressure-cooked pudding delivers every time.

Save This Recipe
Enter your email & I'll send it to your inbox.
By submitting this form, you consent to receive emails from MyGoodFoodWorld
I usually lean savory-give me a plate of vegetable pulao over dessert any day! But every now and then, I crave something sweet and milky. That's when I turn to rice pudding. It's cozy, creamy, and comes together with pantry staples-just like my simple banana pudding recipe.
I grew up on my mum's stovetop rice pudding, slow-cooked until the rice melted into thickened milk. It was comforting, but it took too long.
These days, I make Instant Pot rice pudding. It's quick, fuss-free, and still delivers that nostalgic, creamy texture I love. No eggs, no condensed milk, no heavy cream-just three simple ingredients and the push of a button.
If you are a fan of Instant Pot cooking, then you must try my simple kitchari recipe.
Jump to:
About my recipe

If your burning question is, what's the easiest way to make rice pudding?-This recipe is your answer ,my friend! It's a one-pot recipe that comes together quickly, is foolproof, and turns out the most delicious rice pudding every time.
A quick summary of the recipe:
Prep + Cook + Pressure release time: 30 minutes
Key Ingredients: Milk, rice, sugar
Servings: 4
Dietary: Egg-free, nut-free, soy-free, and gluten-free
Heads up: I'm here to share helpful info, not medical advice. Always double-check ingredient labels-products can vary, and allergens can sneak in. If you have food allergies, make sure everything you use works for you.
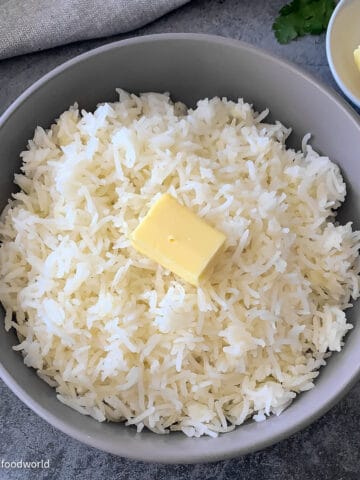
Texture and Consistency: My Instant Pot rice pudding has a creamy, pudding-like texture that feels smooth and silky in the mouth. When hot, it has a flowy consistency, and as it cools, it thickens to a porridge-like texture that's perfect for scooping with a spoon.
Ingredients and Equipment

For the complete list of ingredients, their exact quantities, and the full instructions, scroll down to the recipe card below.
Milk: I use full-fat, whole milk. Please don't use low-fat milk-it just won't give you that rich, creamy texture.
Sugar: I've used unrefined cane sugar, but feel free to use whatever sugar you typically keep in your pantry. Just note that the color of your sugar will affect the color of the pudding.
Rice: I use fragrant short-grain rice. You can use plain or fragrant rice of your choice. See the section below where I talk about the best types of rice for pudding.
Equipment: To make this recipe, you'll need:
- An Instant Pot
- A spatula or ladle
Instructions
Here's a quick step-by-step guide for making the best old fashioned rice pudding in Instant Pot.
Also, see the video at the end of the recipe card below.
Give the rice a good rinse in 2 to 3 changes of water until the water runs clear. Drain it well and set it aside.
Step 1: Dissolve the sugar
Turn on the Instant Pot and select Sauté mode. Pour in the milk and sugar, and gently heat for about 2 to 3 minutes, just until the sugar completely dissolves-don't let it boil.

Step 2: Making rice pudding
Next, stir in the rinsed rice. If Sauté mode is still active, cancel it.

Secure the lid, switch to Pressure Cook mode, and set it to high pressure for 6 minutes.

Once the cook time is up, allow the pressure to release naturally for 10 minutes. After that, do a quick release to let out any remaining steam. Carefully open the lid, stir everything, and turn Sauté mode back on for another 5 minutes.

Stir occasionally as it boils and thickens to your liking.
For the best consistency, stop cooking when the pudding still has a flowy texture-it will thicken up as it cools.

When you're happy with how thick it is, turn off the Instant Pot. Serve it warm or cold-either way, don't forget to top it off with your favorite add-ons!
Tip: After you've turned off the Instant Pot, close the lid again and let the pudding sit for a couple of minutes so it can settle.
Recipe Notes and Tips
What is the best rice to use for rice pudding?
Short-grain or medium-grain rice is best for making a creamy rice pudding. As you may know, rice comes in three sizes: long, medium, and short grain.
Long-grain rice, like Basmati and Jasmine rice, is low in starch. While it's perfect for making jeera rice or buttered rice, it's not the best choice for rice pudding.
Medium grain rice, like Arborio rice (used to make risotto), and Bomba (used for paella), is chewy and has enough starch to make the grains stick together. Medium-grain rice can be a good choice for pudding, but it takes longer to cook.
Short-grain rice, like sushi rice, has the most starch. It cooks down to a soft, tender texture, giving your rice pudding a creamy, porridge-like consistency.
Short-grain rice tends to get clumpy once cooked, so you'll want to keep an eye on it. One way to handle this, especially with Instant Pot rice pudding, is to use a higher milk-to-rice ratio.
Sweetness level: I prefer skipping sweetened condensed milk so I can adjust the sweetness exactly how I like it. The amount of sugar I've used gives the pudding a balanced taste, but feel free to tweak it to suit your preference.
Can you overcook rice pudding? It is a question I see commonly asked. Yes, you can overcook rice pudding, which makes it too thick or clumpy. The Instant Pot helps by cooking the rice perfectly under pressure, and finishing on sauté lets you control the thickness. Just watch it closely, and you'll get creamy pudding every time!
Quick tips:
- Dissolving the sugar in the milk before pressure cooking is key to making sure your rice pudding doesn't burn-so don't skip this step.
- Cooking the pudding for the final 5 minutes in Sauté mode helps thicken it up, gives it a light caramel color, and makes it creamy and rich.
Padma's top tip: Here's my secret to the perfect creamy rice pudding-let it cool a bit before serving. That's when the flavors and texture really shine.
Toppings that you can add to rice pudding
This creamy rice pudding is like a blank canvas that you can jazz up however you like. Here are some suggestions:

Indian-style kheer (payasam) - Add some ground cardamom after you've switched off the Instant Pot. Or, you can add 3 or 4 whole cardamoms while cooking. Just remember to remove them before serving.
American-style classic rice pudding - Add a cinnamon stick to the milk and rice while cooking (remember to remove it before serving), then finish with a sprinkle of ground cinnamon. Or skip the cinnamon and finish off with 1 teaspoon of vanilla extract instead.
My style - Sprinkle with chopped nuts-almonds and pistachios-and some raisins for a fruity, nutty, crunchy touch!

Any doubts or questions? Feel free to ask via the comments below. I will try my best to answer them for you. - Padma
Serving, Storage, Reheating, and Freezing
Serving: You can serve this rice pudding hot or cold. Enjoy it plain or with any toppings (see the section above) of your choice.
Storage: Let it cool completely, then store it in an airtight container. It will keep in the fridge for up to 2 days.
Reheating: The pudding will naturally thicken as it cools down. To adjust its consistency, while reheating, add a little milk to loosen it. Warm it gently on the stovetop if you're reheating, and keep stirring until it reaches the consistency you like.
Can you freeze rice pudding? Freezing rice pudding isn't the best idea because it can become watery once thawed. If you do want to freeze it, store it in an airtight container and thaw it slowly in the fridge before reheating gently with a splash of milk to bring back some creaminess. But honestly, I recommend enjoying this pudding fresh for the best taste and texture!
FAQ
To make creamy rice pudding in an Instant Pot, start by warming milk and sugar using the Sauté mode-this helps prevent burning. Stir in rinsed rice, then pressure cook for 6 minutes. Let the pressure release naturally for 10 minutes, do a quick release, then switch back to Sauté and simmer for a few minutes to thicken. Let it rest with the lid on for a couple of minutes before serving.
After pressure cooking, switch to Sauté and simmer for 3 to 5 minutes, stirring gently. It thickens as it cools, so stop when it still looks a bit flowy.
You can, but brown rice takes longer to cook and won't give you that same creamy texture you get with white short-grain rice. If you're okay with a slightly chewy bite and a nuttier flavor, go for it. Just be sure to adjust the cooking time and liquid ratio accordingly.
Made this recipe? I'd love to know what you think! Leave a ★★★★★ rating and a review below-it motivates me to create more great content for you. You can also connect with me on Facebook and Instagram. And don't forget to subscribe to my newsletter, where I share free recipes, tips, and more!
📖 Recipe

Creamy Instant Pot Rice Pudding (Just 3 ingredients)
Save This Recipe
Enter your email & I'll send it to your inbox.
By submitting this form, you consent to receive emails from MyGoodFoodWorld
Ingredients
Equipment
Instructions
- Rinse the rice in 2-3 changes of water. Drain and set it aside.
- Turn on the Instant Pot and select Sauté mode. Add the milk and sugar to the inner pot and warm it for 2-3 minutes, or until the sugar dissolves.3 cups (~680g) whole milk, ¼ cup sugar
- Add the rice and stir. Cancel Sauté mode (if it's still on), close the lid, and set it to Pressure Cook on high for 6 minutes.¼ cup (~55g) short-grain rice
- Once the cooking time is up, let the pressure release naturally for 10 minutes, then quick-release any remaining pressure.
- Open the lid, stir it, and turn Sauté mode back on for about 5 minutes. Stir occasionally and cook until the pudding thickens a bit more.
- Turn off the Instant Pot, close the lid, and let the pudding rest for a couple of minutes. Serve warm or cold with your favorite toppings.
Nutrition
The nutritional information is calculated using an online calculator and is based on available ingredients and preparation. It should not be considered a substitute for a professional nutritionists' advice. Changing the quantities and cooking technique will alter the nutritional calculations.
Video
Notes
- What is the best rice to use for rice pudding? I say short-grain rice because it's nice and starchy. Some medium-grain varieties, like Arborio, work well too.
- Milk: This rice pudding recipe doesn't use condensed milk, eggs, or heavy cream. So, make sure to use full-fat whole milk for that perfect creamy texture-low-fat milk just won't cut it.
- Sweetness: The amount of sugar I use here gives the pudding just the right level of sweetness. But of course, feel free to adjust it to your taste.
- Quick tips:
- Dissolving the sugar in the milk before cooking helps prevent the rice pudding from burning.
- Cooking the pudding for the final 5 minutes on Sauté mode thickens it up and gives it that extra creamy texture.
- Consistency: Rice pudding should have a porridge-like consistency. At first, it might seem like there's too much milk for the amount of rice, but don't worry-the rice will more than triple in size as it cooks and will soak up most of the liquid. As it cools, the pudding will thicken even more, so it's fine if it's a little flowy when cooking is done.
Alternative quantities provided in the recipe card are for 1x only.
Our content aims to be informative and educational, but it should not replace professional medical advice. Since manufacturing processes can vary and cross-contamination is possible, it's essential to verify product labels and allergen information. Make sure all ingredients align with your specific allergies. As readers, you bear the responsibility for ensuring allergen safety when buying or consuming foods.
Made this recipe? Tag me
@mygoodfoodworld to tell me how it wasMade this recipe? I'd love to know what you think! Leave a ★★★★★ rating and a review below-it motivates me to create more great content for you. You can also connect with me on Facebook and Instagram. And don't forget to subscribe to my newsletter, where I share free recipes, tips, and more!


Kavitha says
Ah, cannot wait to try this one!