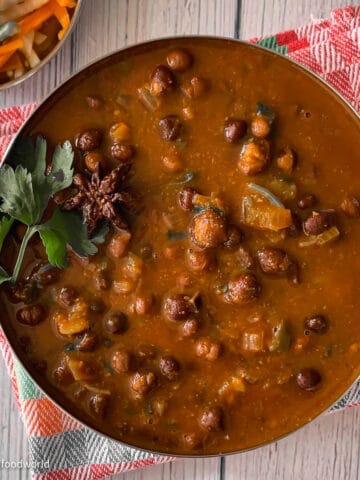
I make this simple chickpeas coconut curry with coconut milk and everyday spices. It comes together in one pot and in under 15 minutes! The creamy, flavorful curry pairs perfectly with rice or flatbread-so yummy!

Save This Recipe
Enter your email & I'll send it to your inbox.
By submitting this form, you consent to receive emails from MyGoodFoodWorld
Lately, this chickpeas coconut curry with jeera rice has become my go-to meal. It checks all the boxes: flavor-packed, nutritious, easy to make, and downright delicious!
If you've read my black beans vs. pinto beans article, you know chickpeas have always been our favorite protein source. I cook with black chickpeas just as often as regular chickpeas, and while my recipe of kala chana is one to die for, this chickpea curry with coconut milk is currently at the top of my list.
What I love most about this chickpeas coconut curry recipe is how effortless it is. Thanks to canned chickpeas, it's a quick and easy dish that requires minimal prep yet delivers incredible flavor. Perfect for a busy weeknight dinner! And the best part? Leftovers taste even better the next day!
This post includes helpful tips, but if you're in a hurry, use the "Jump to Recipe" or section links to skip ahead.
Jump to:
Allergens free labels
This coconut chickpeas curry is a vegan and allium-free recipe-it contains no onions or garlic. It is also:
- gluten-free
- grain-free
- soy-free
- nut-free
- dairy-free
Disclaimer: Our content aims to be informative and educational, but it should not replace professional medical advice. Since manufacturing processes can vary and cross-contamination is possible, it's essential to verify product labels and allergen information. Make sure all ingredients align with your specific allergies. As readers, you bear the responsibility for ensuring allergen safety when buying or consuming foods.
About My Recipe

There are many ways to make this curry. You can go the Thai route by frying some red curry paste in oil, adding curry powder for depth, and finishing with a splash of lime juice. You can try the Brazilian style-fiery with peppers, paprika, onions, and lots of garlic. I make mine the Indian way, with ginger, cilantro, and garam masala to flavor the curry.
What makes my vegan coconut chickpea curry special is that it is quick, fuss-free, and packed with flavor, all while being completely allium-free. Let me break it down for you:
Ease: This is a quick and easy 15-minute recipe, perfect for busy days. I love that there's hardly any prep-just open a can of chickpeas and coconut milk, squeeze out some tomato paste, and you're almost there! The only chopping required is a bit of ginger, which you can skip if you use pre-made ginger paste. Plus, I stick to pantry staple spices.
No onion and no garlic: I keep the flavors simple and let the flavor of the coconut milk shine. If you prefer dishes without onion or garlic, this recipe is for you!
Delicious: Just because this is a quick and easy recipe with minimal ingredients doesn't mean it lacks flavor! You'll be surprised by how tasty this curry is, thanks to the technique of layering flavors.
Adaptability: You can keep it simple like I do, or build on it by adding more flavors and textures to make it even more wholesome. Check out the section below for ideas on what else you can add and when to incorporate them.
Ingredients

For the complete list of ingredients, their exact quantities, and the full instructions, scroll down to the recipe card below.
- Chickpeas: I use canned chickpeas-regular light-colored ones. Brown chickpeas will work too.
- Oil: I go with coconut oil, but you can use any plant-based oil of your choice. Got extra? Use it to make this vibrant beetroot poriyal.
- Tomato paste: Also known as tomato concentrate, packs an intense tomato flavor, so a little goes a long way! Use any remaining paste to make this macaroni and tomatoes recipe.
- Coconut milk: Please use full fat coconut milk for this recipe. Light coconut milk will not work for this one. Use any leftovers in this . Full-fat coconut milk is a must for this recipe-light coconut milk just won't cut it. Any leftovers? Use them in this creamy sweet potato turmeric soup.
- Spices: Ground coriander for an earthy note, garam masala for depth, turmeric and ginger for warmth, and, of course, salt.
Besides these, you'll need some chopped cilantro for garnish and water to help cook the spices.
If you have any questions regarding these ingredients, feel free to ask in the comments section below and I will try my best to answer them for you.
Instructions
Before you start making this curry, drain the chickpeas and set the liquid aside-you can add it to your mung bean soup or homemade stock. Unlike in this rajma recipe, where I use the liquid from the can, I prefer not to use it for this dish. Also, finely chop the ginger and measure out all the ingredients.
Also, check out the video at the end of the recipe card below.
Sauté the ginger in oil over medium heat. Add the tomato paste, powdered spices, and salt.


Pour in some water and mix well. Once the water comes to a low boil, cover the pan and cook over medium-high heat for a few minutes or until you see the oil floating on top.


Hint: Stir the sauce once or twice and remember to drain any water that collects under the lid back into the pan.
Now, add the chickpeas to the curry sauce and more water. Stir, cover, and cook for a few more minutes, stirring occasionally to prevent the spices from sticking to the bottom of the pan.


Mash some of the chickpeas with the back of a spoon to help thicken the sauce.
Pour in the coconut milk and bring the curry to a boil.


Taste and check for salt, adding more if needed.
Reduce the heat, cover, and let it simmer for a few more minutes to allow the flavors to meld and the sauce to thicken further.


Finish with chopped cilantro.


Remove from heat and, if you'd like, garnish with some fresh ginger.
Recipe Notes
Servings: This recipe is good enough for two people if paired with some rice or flatbreads, and some salad (this carrots cucumber salad!) on the side.
Chickpeas: I use a standard can of chickpeas. The weight mentioned is the drained weight.
Garam masala: I add just a little for a subtle hint of flavor. If you prefer a stronger flavor, increase it to 1 teaspoon.
Ginger: I use fresh root ginger, but you can substitute it with 1 teaspoon of ginger paste. Here is a recipe for how to make ginger paste at home.
Recipe Tips
Cooking a curry isn't rocket science, but it's the little tips and tricks that make all the difference. Here are some I've learned over the years:
Layer the flavors: Whether it's this luxurious shahi paneer recipe or my quick and easy chickpea curry with coconut milk, the secret to a delicious curry is layering the flavors. Add the spices and aromatics one by one, letting each ingredient cook for a bit before adding the next. As tempting as it is to just "dump and go," trust me-the flavor comes from that layering technique.
Add powdered spices early: Let the spices cook at the beginning of the process so they have time to release their fragrance and develop depth.
Mash the chickpeas: Use the back of your spoon to mash some of the chickpeas. This naturally thickens the sauce, giving it the perfect consistency to scoop up with bread or pour over rice.
Padma's top tip: Always drain any water that collects under the lid back into the pan-don't let that flavor go to waste!

Variations
Make it spicy: Want to turn up the heat? Add 1 or 2 finely chopped chili peppers when you sauté the ginger. You can also increase the spice level by adding extra garam masala when stirring in the chopped cilantro.
Add vegetables: To make this curry even more wholesome and nutritious, add 1 diced sweet potato. Let it cook for a few minutes, then add the chickpeas. You can also toss in a handful of greens of your choice-spinach and kale work particularly well here. Chop the greens and add them just before the coconut milk. The few minutes of simmering after that will soften them enough while keeping their vibrant color intact.
You can quite easily turn this into coconut curry chickpeas with pumpkin and lime! Just add diced pumpkin along with the chickpeas and let it cook until tender. The natural sweetness of pumpkin pairs beautifully with the creaminess of coconut milk, making the curry even more wholesome. Finish with a squeeze of fresh lime juice for a bright, citrusy contrast that lifts the flavors.
Make it kid-friendly: This dish is a great way to introduce kids to flavorful curries. They'll love the natural sweetness and creamy texture from the coconut milk. If making it for little ones, skip the garam masala and stick to the gentle warmth of ginger.
No coconut milk?: Here's a list of substitutes for coconut milk that you can try.
No chickpeas?: No worries! You can follow the same recipe with any other canned beans you have on hand-garden peas or butter beans work especially well.
Any doubts or questions? Feel free to ask via the comments below. I will try my best to answer them for you. - Padma

Storage and Reheating
Fridge: Let the chickpeas coconut curry cool completely before transferring it to fridge-safe containers. It will stay fresh for 2-3 days.
Freezer: Store the cooled curry in freezer-safe containers, ideally in single portions, and freeze for up to 1 month.
Reheating from the fridge: This curry tastes best when warm. Transfer the portion you plan to eat into a pan over medium-low heat and bring it to a gentle simmer. If it has thickened too much, add a splash of water to reach your desired consistency. To reheat in the microwave, place the curry in a microwave-safe container, cover it with a plate or kitchen towel, and microwave on high until evenly heated.
Reheating from frozen: Thaw the curry in the fridge overnight, then reheat using one of the methods above.
FAQ
Absolutely! You can make a delicious chickpea curry without coconut milk. Instead of coconut milk, use water, vegetable broth, or even blended tomatoes for the base. If you still want a creamy texture, try adding cashew cream, yogurt (dairy or plant-based), or even a splash of oat or almond milk. The flavors will be slightly different, but the curry will still be rich and satisfying. Just be sure to adjust the seasoning to balance the acidity and depth of flavor.
Yes! Chickpea coconut curry is freezer-friendly. Let the curry cool completely before transferring it to freezer-safe containers-ideally, in portion sizes for easy reheating, for up to a month. When you're ready to eat, thaw it overnight in the fridge and reheat it on the stovetop over medium-low heat, adding a splash of water if it has thickened too much. You can also microwave it, covered, until heated through. Just keep in mind that coconut milk can sometimes separate slightly after freezing, but a quick stir while reheating will bring it back to its creamy goodness!
Yes, you can! If you don't have chickpeas on hand, you can easily swap them out for other canned beans. Butter beans, cannellini beans, or even kidney beans work well and soak up the flavors beautifully. If you want a slightly firmer bite, black chickpeas (kala chana) are a great option too. Just follow the same recipe, and you'll have a delicious, hearty curry in no time! And if you're using home-cooked beans, be sure they're fully cooked before adding them to the curry.
Serving Suggestions
This curry pairs well with roti and rice. My favorite way to enjoy it is by making it into a hearty gluten free meal-with buttered rice and serve alongside this Indian onion salad made with red onions. I don't squeeze lime juice directly onto the curry but prefer to serve a wedge on the side as an option.
This curry has a mild flavor, but if you like to spice things up, pair it with fiery bullet naan and cool it down with some beetroot raita to soothe your palate!
I love how this creamy curry perfectly pairs with my soft and delicious coconut milk crepes. You should give this combination a try!
Made this recipe? I'd love to know what you think! Leave a ★★★★★ rating and a review below-it motivates me to create more great content for you. You can also connect with me on Facebook and Instagram. And don't forget to subscribe to my newsletter, where I share free recipes, tips, and more!
📖 Recipe

Chickpeas Coconut Curry Recipe
Save This Recipe
Enter your email & I'll send it to your inbox.
By submitting this form, you consent to receive emails from MyGoodFoodWorld
Ingredients
Equipment
Instructions
- Drain the water from the chickpeas.
- Finely chop the ginger.
- Measure out the rest of the ingredients.
- Heat oil in a pan over medium heat. Add the chopped ginger and sauté for a minute.1 tablespoon coconut oil, 1 inch piece (~10g) fresh ginger
- Stir in the tomato paste and spices. Pour in ½ cup of water and mix well. Once the water comes to a boil, cover the pan and cook for 3-4 minutes, or until you see the oil floating on top.1 and ½ tablespoons tomato paste (concentrate), 1 teaspoon salt, ¼ teaspoon turmeric, 3 teaspoons ground coriander, ½ teaspoon garam masala, 1 cup water
- Add the chickpeas along with the remaining ½ cup of water. Stir and bring to a boil. Cover and cook for another 4-5 minutes, stirring once or twice. Mash some of the chickpeas with the back of the spoon to help thicken the sauce.1 can (~250g; 8¾oz.) canned chickpeas
- Pour in the coconut milk, stir, and bring to a boil. Taste and adjust the salt, if needed. Reduce the heat to low, cover, and let it simmer for another 3-4 minutes.¼ cup coconut milk
- Stir in the chopped cilantro, if using, then take the pan off the heat.2 tablespoons chopped cilantro
- Serve hot with rice or flatbread, garnished with slivers of ginger and a wedge of lime on the side.1 tablespoon slivers of ginger, wedge of lime
Nutrition
The nutritional information is calculated using an online calculator and is based on available ingredients and preparation. It should not be considered a substitute for a professional nutritionists' advice. Changing the quantities and cooking technique will alter the nutritional calculations.
Video
Notes
- Allergens-Free Labels: This is a gluten-, grain-, dairy-, nut-, soy-, and allium-free recipe.
- Chickpeas: I use a standard can of chickpeas. Unlike my rajma recipe, I don't use the chickpea water here. The weight mentioned is the drained weight.
- Oil: I use coconut oil, but you can use any oil of your choice. If you're okay with it, ghee works too.
- Ginger: I use fresh root ginger, but you can substitute it with 1 teaspoon of ginger paste. Here is a recipe for how to make ginger paste at home.
- Coconut milk: Use canned coconut milk, not the kind from a carton.
- Garam masala: I add just a little for a subtle hint of flavor. If you prefer a stronger flavor, increase it to 1 teaspoon.
Alternative quantities provided in the recipe card are for 1x only.
Our content aims to be informative and educational, but it should not replace professional medical advice. Since manufacturing processes can vary and cross-contamination is possible, it's essential to verify product labels and allergen information. Make sure all ingredients align with your specific allergies. As readers, you bear the responsibility for ensuring allergen safety when buying or consuming foods.

Lex says
This was so flippin tasty!
Padma Kumar says
Thank you Lex, so happy to know that you liked it!
Hannah says
Ooh cannot wait to make this curry. Looks incredible!